Pages

Comments are welcome and very much appreciated!

Wednesday, September 27, 2017

Heartfelt Creations- Sunflowers Fall

Good morning!

I have two cards for you today using the Classic Sunflowers and the Beary Fun Retreat paper and Sunflower Accents.
These cards could be used for a lot of different occasions but they really look like they could be nice Thanksgiving cards, don't you think?  I would stamp Happy Thanksgiving inside.


Heartfelt-Sunflowers In Fall

Products:
HCPC-3626  Classic Sunflower Stamp Set
HCD1-753   Classic Sunflower Die
HCDP1-282  Beary Fun Retreat Paper Collection
HCD1-7153 Sunflower Accents Die
HCPC-3799 Sunflower Accents Stamp Set
HCPC-3312  Uplifting Scripture Stamp Set
HCD1-7146  Festive Holiday Die
HCD2-751   Cut Mat Create 2A Die
HCD1-7154  Small Circle Die
HCPC-3656  Delightful Daisies Stamp Set
HCD1-760   Delightful Daisies Die
HCDA1-449  Stack and Store Dauber
ANC829     Express-O Yourself Prills
352854     Metal Tip
TSMP201    Memento Morocco
ANC851     Rock N' Roll Prills
159723     Dries Clear Adhesive
HCST1-401  Deluxe Flower Shaping Kit
D110305    Stamp Mat Pad
TSMP802    Memento Peanut Brittle
TSMP801    Memento Potter's Clay
TSMP704    Memento New Sprout
31510      Funnel Tray
359848     Spellbinder Tool N' One
TSMP900    Memento Tuxedo Black


Instruction: Other Products: Dandelion Memento, Oxide Distress Ink: Shabby Shutters, Wild Honey, Spiced Marmalade, White Card Stock, Brown card stock, Fun Foam, clear embossing powder, Versamagic, brown pearl halves

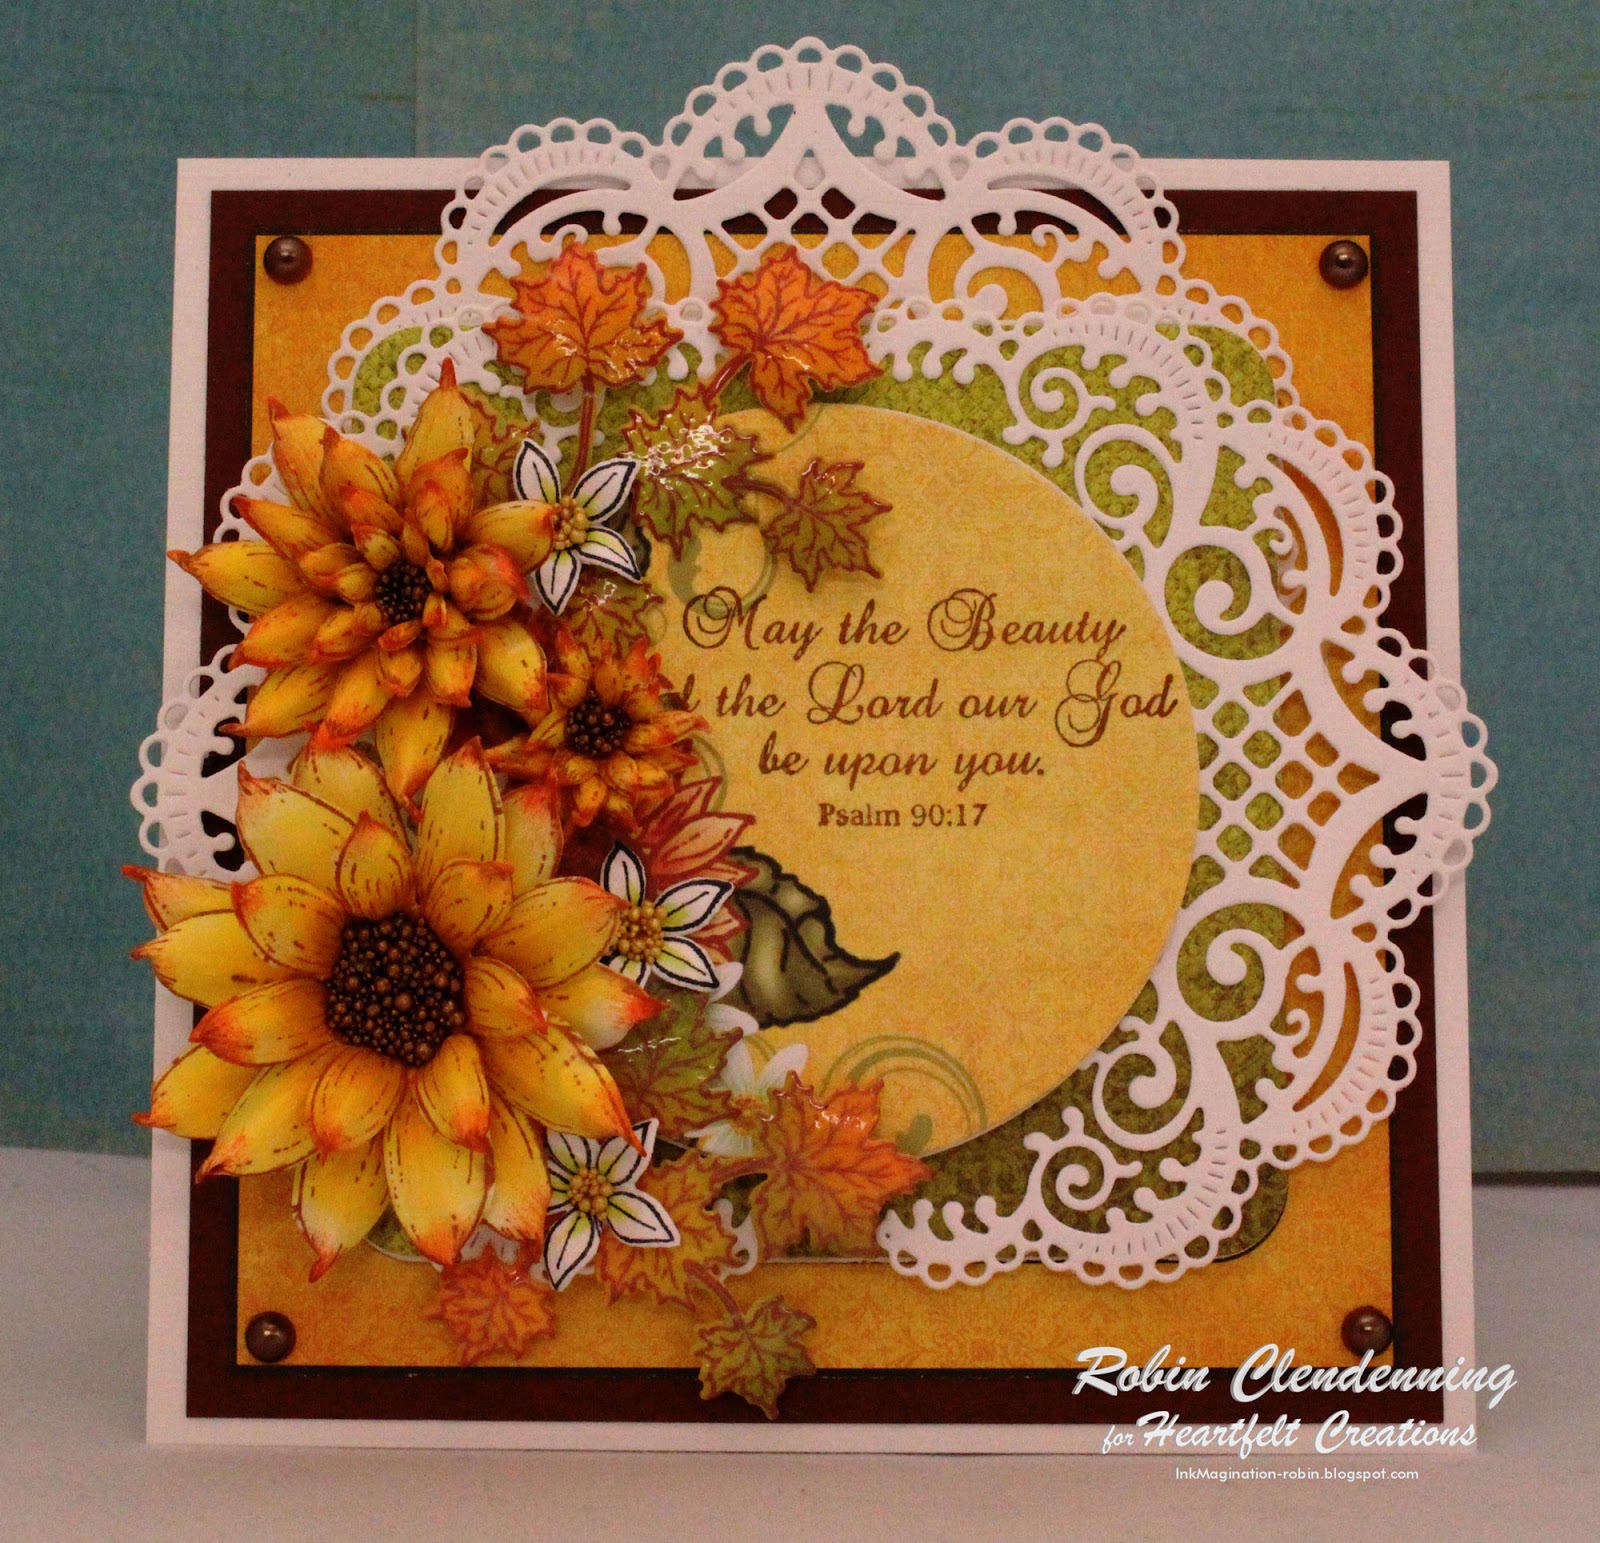
Instructions:  Card size: 5 1/4" X 5 1/4", Use the Cut Mat Create 2A and Small Circle Die to cut designer paper and Fun Foam for this card (they fit the designer paper designs perfectly) and cut one layer from brown card stock to fit,  I use glue not tape runner for the Fun Foam layers to make sure it stays stuck but first stamp the Scripture onto the decorative paper circle. Cut the Festive Holly Die from white linen card stock 3 times, sticking one of the die cuts under the square layer of Fun Foam/Decorative paper, at the top and the other two under the circle Fun Foam/decorative paper layer.  Stack and adhere all layers onto a white folded 5 1/4" square card base.  Sponge Oxide Inks onto white card stock blending colors together then stamp and die cut with the Maple leaf die from Sunflower Accents, use VersaMagic and clear embossing powder to heat emboss. Stamp, sponge and die cut sunflowers from Classic Sunflowers. Stamp, die cut and sponge Daisies. Wet and shape flowers, let dry then stack and glue together.  Add Prills to the centers of all flowers.  Glue leaves around left side of circle (foam tape some of the leaves up) and then arrange sunflowers and daisies on top of leaves.  Add the brow half pearls and you are done.


Heartfelt-Unfailing Love

Products:
HCPC-3626  Classic Sunflower Stamp Set
HCD1-753   Classic Sunflower Die
HCDP1-282  Beary Fun Retreat Paper Collection
HCPC-3312  Uplifting Scripture Stamp Set
HCD1-7146  Festive Holiday Die
HCPC-3656  Delightful Daisies Stamp Set
HCD1-760   Delightful Daisies Die
HCD2-751   Cut Mat Create 2A Die
HCD1-7154  Small Circle Die
HCDA1-449  Stack and Store Dauber
ANC829     Express-O Yourself Prills
352854     Metal Tip
TSMP201    Memento Morocco
ANC851     Rock N' Roll Prills
159723     Dries Clear Adhesive
HCST1-401  Deluxe Flower Shaping Kit
D110305    Stamp Mat Pad
TSMP802    Memento Peanut Brittle
TSMP801    Memento Potter's Clay
TSMP704    Memento New Sprout
31510      Funnel Tray
359848     Spellbinder Tool N' One

Instructions: Other products: Whtie seam binding, Dried Marigold Distress Ink refill (for dying seam binding), Fun Foam-black, Pearl halves, gold shimmer card stock, white card stock.

Instructions: Card size: 5 " X 5", cut circle from one of the designs on designer paper (and stamp with verse using Morocco Memento) and the square from another piece of designer paper. Cut Fun Foam for each layer.  Cut a square 4 1/4" from Maple leaf designer paper and a square 4 3/4" from orange designer paper (All are from Beary Fun Retreat paper collection). Cut a gold shimmer layer the size of the card base (card base is white) and cover card base to start the stack.  Glue the Fun Foam layers to each corresponding paper layer, stack and glue all but the circle to the card base.  Cut 2 Festive Holly Die from gold shimmer and glue to square on card base, overlapping the tips top and bottom.  Glue circle Fun Foam/Decorative paper/verse to the top of stack. Stamp, die cut and sponge color onto Classic Sunflowers and Delightful Daisies from white card stock, wet and form then let dry.  Stank flowers together and glue in place. Add Prills to all flower centers. Dye seam binding with ink refill and set out to dry. Make a large loop crinkled bow and give it 2 extra tails, glue to left bottom corner just under/next to circle.  Add flowers and pearl halves and you are done.

Thanks so much for visiting today, hope you got some inspiration!!
Robin
Philippians 4:6-8
Be anxious for nothing, but in everything by prayer and supplication, with thanksgiving, let your requests be made known to God; and the peace of God, which surpasses all understanding, will guard your hearts and minds through Christ Jesus.
Finally, brethren, whatever things are true, whatever things are noble, whatever things are just, whatever things are pure, whatever things are lovely, whatever things are of good report, if there is any virtue and if there is anything praiseworthy—meditate on these things.

Wednesday, September 20, 2017

Heartfelt Creations- Mulit Step Card...Campfire Fun

Good morning!
Yes, I do believe it is feeling a bit like fall this morning.
There is a chilly crispness in the air and the leaves are starting their journey to a full display of color for the world to enjoy.
These little guys are having a nice campfire sing along with music, marshmallows, honey and hot chocolate!  What could be better!
It might be a scouting group, who knows...I think the guitar player is the scout leader and he has a bunch of kids with him for this last hoorah of summer!


I made up this step card so that I could better show the bears in a circle around the campfire.  I really like it!  I did do a pattern for you all, you will find it near the bottom of my post (for anyone interested in making a card like this).


I love this bear jamboree and just look at those toasted marshmallows...that bear has it down to a science!

This little guy would much rather have the honey his mom put in the backpack!


 This bear has a hot cuppa chocolate!
What else for a nice campfire?  I'm sure there are melty marshmallows in the cup as well, don't you think?


Heartfelt Creations-Multi-step Campfire Fun

Products:

HCD1-7151 Beary Fun Retreat Die
HCD1-7152 Happy Time Treehouse Die
HCD1-7153 Sunflower Accents Die
HCPC-3797 Beary Fun Retreat Stamp Set
HCPC-3798 Happy Time Treehouse Stamp Set
HCPC-3799 Sunflower Accents Stamp Set
HCDP1-282 Beary Fun Retreat Paper Collection
HCD1-7122 Woodsy Landscape Die
HCD1-7123 Woodsy Wonderland Die
HCPC-3767 Woodsy Wonderland Stamp Set
HCPC-3766 Woodsy Treescape Stamp Set
HCPC-3768 Woodsy Critters Stamp Set
HCD1-7124 Woodsy Critters Die
ANC829    Express O Yourself Prills
352854    Metal Tip
173842    Scor-Pal
159723    Dries Clear Adhesive
HCST1-401 Deluxe Flower Shaping Kit
TSMP900   Memento Tuxedo Black
TSMP800   Memento Rich Cocoa
31510     Funnel Tray

Instructions: Other products: White card stock, Diamond Stickles, Foam Tape, Clear Embossing Powder, Oxide Distress Inks: Peeled Paint, Spiced Marmalade, Wild Honey,Distress Ink: Tea Dye, Copics: B91,B93,B95,B00,B02,Y15,Y38,Y21,YR24,YR65,YR27,T21,R14,R29,E50,E21,E93,E08,E09,E53,E33,E35,W2,W3,W5,W7,YG61,YG91,YG93,YG63,C01,C3,C5, Martha Stewart grass border punch.

Instructions:  Card size is 5 X 7 Pattern for this multi-step card is below as a diagram to make it easier to follow. Start with white card stock 7 X 10" and make the first cut 1" from the bottom and 1 1/2" in from the left side cut from 1" to 6". Nest cut is 1" from bottom at 1 1/2" from first cut and going from 1" to 7", the next and final cut is from 1" to 7" at 2 1/2" from the last cut. Score the two outside sections at 5", score between cut 1 and cut 2 at 1", 2" and 6", score between cut 2 and cut 3 at 1", 2", 3", 4" and 7". Cut dark blue designer paper for each section and then cut one of the designer papers with the sunset and cut pieces to fit each section. Punch grass from green designer paper and gold designer paper. Stamp, die cut and color 4 bears, campfire, flowers, trees, rocks and grass, birds leaves and sunflowers. Space bears out so that they look like they are in a circle round the fire (this is how I came up with this pattern). Do a temporary adhesion on the bears so that you can place thing under and around. Fill in under and around with grass, flowers, and trees.  Slightly form sunflowers and leaves.  Emboss maple leaves with clear embossing pad (like Top Boss or VersaMark) and clear embossing powder.  Add Prills to the centers of the sunflowers. Add a bit of Stickles to the coneflowers and campfire.  Cut a sentiment from the designer paper and add it to the front then add one sunflower to each side of the sentiment. Add the oak and maple leaves to the tops of both outside sections. When I glued my bears on I use  foam tape at their head and shoulders.


Thank you so much for visiting today!!
I hope you will try your own Bear Jamboree card!!
Robin

Ephesians 4:29New King James Version (NKJV)

29 Let no corrupt word proceed out of your mouth, but what is good for necessary edification, that it may impart grace to the hearers.
Proverbs 18:21
Death and life are in the power of the tongue,
And those who love it will eat its fruit.
I love the phase "Speak words of life" and try to do that when speaking with other people...the world has enough negativity, I don't want to add to it.  Let all build each other up and make our world a better place for us all to live!!
God loves it when we speak good and pure things even to ourselves.  Words spoken are powerful, don't take it lightly, God doesn't.

Saturday, September 16, 2017

Heartfelt Creations-Tri-fold Shaped Card

Good morning!

I was watching the video that Liz Gaze had on Facebook (you can find HERE) for making the shaped cards with the Botanic Window Die so I got on the stick and made one for a color challenge at Splitcoaststampers. 
I did the tent style below.


But when I first watched the video I was wondering if I could do a Tri-Fold shaped card with this die, so of course, I had to try it.

For the base:
I took a piece of card stock 12 X 6" scored at 4" and second score at 7 3/8" then followed the instructions for the shaped card which was to let the die hang over the fold right outside the straight edge (see photo). 

Place the top plate just inside the second score line (opposite the fold)
Otherwise you will cut where you don't want to on your 3rd panel.  The machine will only cut where the top plate is.  When you are done cutting, you will unfold and finish the cut on the outside edge of the 1st panel, (only put your top plate over that outside edge).
unfold the first so that you don't make any cuts on your first panel that you do not want and refold on the second score to do your next cut placing the die on top of your second panel where it is already cut, matching cut lines, so that you can cut the third panel, make sure the top plate does not go over entire die or all your work so far will be blown. See photo below. (you will never have more than 2 layers of card stock at a time).
after cutting, unfold and finish outside edge the way you did for the first panel.
This is what you end up with (below).
Cut an extra full window out of another piece of your card stock for the front panel and glue over your front panel matching all cuts (the right side edge will hang free so it does not interfere with the fold).
For this card I used the inner die of the Botanic Window on white and the outline die on decorative paper (from the Classic Petunia Collection).  
I stamped, cut and colored all my flowers and then formed and set them aside to dry (I mist the back with water).  I stamped, cut and colored my hummers, cut the leaves from light green and formed.  I cut up the long petunias and leaves border from the Large Petunia set to use as a base for my floral arrangements and also added the leaves from the Cut Mat and Create sets. Then I added all my flowers and hummers (the hummers have a triple later of foam tape to pop them up).

Heartfelt Creation stamps and dies used on this card:
HCD1-7100 Botanic Window Die
HCD1-7140 Large Classic Petunia Die
HCD1-7139 Small Classic Petunia Die
HCPC-3786 Large Classic Petunia Stamp Set
HCPC-3785 Small Classic Petunia Stamp Set
HCD1-7125 Wildwood Florals Die
HCPC-3769 Wildwood Florals Stamp Set
HCD1-7102 Regal Hummingbird Die (Limited time only)
HCPC-3742 Regal Hummingbird Stamp Set 
HCD2-750 Cut Mat Create 1B Die
HCD2-751 Cut Mat Create 2A Die
ANC822 I Can Not Tell A Lilac Prills
TSMP707 Bamboo Leaves
HCST1-401 Deluxe Flower Shaping Kit

Other products: Pearl halves, Spellbinder die, Stickles, Nuvo-light green, Citrus dye ink, Wilted Violet Distress Ink, Light green card stock, purple card stock.

Thank you for visiting today!
Robin

Wednesday, September 13, 2017

Heartfelt Creations-Beary Fun Luminary

Good morning!

Welcome to the New Release Heartfelt Creations Wednesday post!
I am always so happy you stop by to see what I have created for Heartfelt on Wednesdays!! Make sure you see the Heartfelt Creation blog post to see all the wonderful creations this week.
These little bears around the campfire make a wonderful luminary!!
What a fun release for fall.  I love the
Sunflower stamps and dies that go so well with this release as well.  
To make a night-time camp-out scene I have punched stars from my base dark blue card stock and added little white dots for smaller stars.


Each side has a different little scene.

I punched a 1" circle for my moon and added a bit of gray and then yellow ink.


I think these guys like to munch, don't you?


Heartfelt Creations Beary Fun Luminary

Products:
HCD1-7151  Beary Fun Retreat Die
HCD1-7152  Happy Time Treehouse Die
HCD1-7153  Sunflower Accents Die
HCPC-3797  Beary Fun Retreat Stamp Set
HCPC-3798  Happy Time Treehouse Stamp Set
HCPC-3799  Sunflower Accents Stamp Set
HCDP1-282  Beary Fun Retreat Paper Collection
HCD1-753    Classic Sunflower Die
HCPC-3626  Classic Sunflower Stamp Set
HCD1-757    Leafy Branch Die
HCPC-3644  Birds and Blooms Stamp Set
HCD2-749    Cut Mat Create 1A Die
HCD1-7118  Delicate Border Basic Die
HCD1-756    Eyelet Oval and Basic Small Dies
HCD1-757    Eyelet Oval and Basic Large Dies
ANC829       Express-O Yourself Prills
ANC818       Go Man Go Prills
242174         Vellum Paper
352854         Metal Tip
159723         Dries Clear Adhesive
HCST1-401 Deluxe Flower Shaping Kit
TSMP802    Peanut Brittle Memento
TSMP801    Potter's Clay Memento
31510           Funnel Tray
TSMP900   Tuxedo Black Memento

Instructions: Other Products: 1" Circle Punch, Star Punch, Grass Border Punch (Martha Stewart), White Acrylic Paint, Yellow Memento, Mowed Lawn Distress Ink, Copic Pens:E44,E43,E31,E33,E35,E53,E97,E09,E08,E17,E79,E93,YR16,YR31,YR27,YR24,YR18,YR14,YR65,YR02,Y11,Y38,Y00,Y15,G20,G21,YG63,YG61,W2,W5,C5,C01,B39,B91,B93,B95,B97, Dark Blue Card Stock, Green Card Stock, White Card Stock, Burlap.

Instructions: Size: 5" X 5" X 7"  Cut two pieces of dark blue card stock 6" by 10 1/2".  Score at 1/2" and 5 1/2" on the long side for both pieces. The 1/2" is a tab for gluing both pieces together but do not glue together until after cutting ovals (I actually waited until I was finished decorating each side).  Cut an oval out of each side (X 4). Cut designer paper to fit each side and cut a scalloped oval from the center of each piece and then glue paper to each panel (4).  Punch small stars between oval opening and scalloped oval paper then cover back of each panel with vellum.  Add to the stars with white paint and a small stylist making small white dots.  Cut 4 grass borders and glue to the bottom of each panel. Cut dark blue Delicate Borders for the top of each panel and glue in place.  Stamp, die cut and sponge color on 3 full sets of Classic Sunflowers, (I used Yellow, Peanuts Brittle and Potter's Clay Memento ink). Form flowers and glue together then fill centers with Express-O Prills.  Stamp, die cut and sponge small flowers from Birds and Blooms, form and glue together. Stamp, die cut and color (with Copic Markers) bears, 3 campfires, Treehouse, 2 small sunflower plants and 4 Sunflower/acorn borders. Die cut 3 or 4 flourishes from Cut Mat Create from green card stock and cut as needed or to fit under formed sunflowers. Decorate each side of the luminary with the campfires (except house side) and then bears (only one side has 2 bears) On the house side, add the 2 sunflower plants and moon (1" circle punch).  Add the sunflower/acorn border to the top of each side.  Now fill in corners with green flourishes, flowers and small bits of burlap.  Use Score tape or glue to attach panels together at 1/2" tabs.  Use a small battery operated tea light to light up luminary.

Thanks for visiting today and have a blessed day!
Robin

Psalm 121:1-2
I will lift up my eyes to the hills—
From whence comes my help?
My help comes from the Lord,
Who made heaven and earth.


Wednesday, September 6, 2017

Heartfelt-Woodsy Tunnel Card

Good morning!

I  have to admit, this Woodsy Wonderland release is one of my favorites.
How could it not be when I live in the mountains of the Sierra National Forest.  This is like my backyard (including the skunks!).


I love these curved borders, they work wonderfully as toppers.


I chose different papers for each page.


This one is bright and happy and look at those cardinals, I love cardinals!


This last page I reserved for journaling and/or writing a note to the recipient.


Heartfelt Creations-Woodsy Tunnel card

Products:

Instructions: Other Products: Flower Soft, 3M Foam Tape, Fun Foam-black

Instructions: Put the Kraft Layered Circle Card together and then cut designer paper for each page inside and out.  Die cut circles in the center of each sheet using the new Circle Basic dies (both large and small sets) to fit each circle on the layered circle card.  Pick coordinating designer paper for each page and die cut circle frames for each opening and also a border for the top of each page.  Since this is a masculine card I used the plaids, browns and dark greens with small print designs for this part.  Stamp, die cut and color all Woodsy pieces (several of the Landscape and Wonderland sets).  I used a combination of sponging with Memento dye inks (Bamboo eaves, New Sprout) and Copic Markers (E53, E33, E35, E97, E11, E42, E43, E44,R21, R24, R29,W01, W03, W05, C02, C03, C05, BOO, BO2, Y11, Y15, Y35, Y38, YG03, YG23, YG17, RV10, RV02, BV000, BV01, V01, V12, V15) Stamp, die cut and sponge color on Dogwood pieces (Memento: Grape Jelly, Lulu Lavender, Angel Pink, Rose Bud, Dandelion).  Form all flowers with the Deluxe Flower Shaping Kit (See Emma Lou's video for more instruction on flower shaping).  Glue each cut designer paper to each page front and back matching edges and circles then glue each border and coordinating circle frame to each page. Tear a strip of dark green "ground" for the bottom of each page (except back two pages) and sponge edges with Bamboo Leaves Memento then glue in place.  Fill pages with little animals and trees.  I purposely went beyond the inner circles to give more dimension to my tunnel.  I sometimes used to paper to dictate where to place certain animals.  I finished the bottom of each page (the ground) with Flower Soft and different colors of Prills like flowers.  The tops of all pages are decorated with the multi-colored Dogwood and leaves. Special instruction for the back two pages: the next to last page has a picture of a deer (from designer paper) glued to the last, small circle before gluing the designer paper over the page (like a sandwich). This makes the last two pages solid for adding pockets and journaling tags or more small cards.  I decorated the tops with the die cut border in blue and then die cut my pockets from the same blue designer paper.  I cut tags from the designer paper and added fiber to 1 and raise the middle square section of the other with black Fun Foam for dimension.  The pages are finished with Dogwood on top and a small Dogwood flower on the Card/tag. 
See all the cards for this week HERE.
Thanks for visiting!
Robin